
User Management
Effortlessly manage user permissions with precision and ease with Next Identity console
Next Identity console has the concept of Access Levels, defining roles, organizational scopes, and environment permissions for users upon creation. In essence:
-
Role: Specifies user permissions and capabilities. More details can be found in the Roles page.
-
Level: Determines the organizational scope of the role, with options including Company, Organization, Property, and Client. More details can be found in the Levels section.
-
Environment: Specifies accessible environments (e.g., Development, Test, Production) tailored to each customer's needs.
Access Level:
- A dynamic combination of role, hierarchical level, and environment for nuanced user permissions.
- Access Level: Role + Level + Environment
Multiple Access LevelsUsers can be assigned multiple access levels, offering versatile control over their interaction with different parts of the system.
Levels
Users can be assigned to different organizational scopes, each granting varying privileges. Higher levels confer greater privileges, necessitating careful assignment.
- Company: Highest level, encompassing the entire customer account.
- Organization: Subdivision within the customer.
- Property: Groups of clients managed collectively.
- Client: Individual applications, offering the most granular access.
Practical Examples
Example | Role | Level | Environment | Comment |
|---|---|---|---|---|
| Reader | Company (HyperGlobe) | Production | Exclusive read-only access to view system data without modification rights. |
|
|
|
|
|
|
|
|
| Manages properties, clients, configurations, translations, workflows, and users and roles. |
Platform Views
In addition to Access Levels, the Next Identity console introduces the concept of Platform Views. Platform Views are designed to provide users with the best experience based on the activities they will perform within the Next Identity platform. These views help tailor the interface and available tools to the user's role and responsibilities.
There are two available Platform Views:
- Service Management View: This view is ideal for users who are part of a cross-application CIAM team. These users manage security policies and overall CIAM strategies across many applications. The Service Management View provides them with the necessary tools to perform these tasks effectively.
- Application Management View: This view is designed for users who manage a specific application. It provides an individualized view of that application's configurations, allowing users to connect it to the CIAM service, customize User Hosted Journeys, and manage security settings.
Each of these views comes with its own set of roles, offering granular control over what actions users can perform within the platform. More details about the roles specific to each Platform View can be found in the Roles page.
Platform Views can be selected during user creation and edited later if necessary, ensuring the console interface aligns with the user's role and responsibilities.
Application Management View & Environment AccessAccess to the Application Management View includes access to all environments within that view. It is not possible to restrict permissions to only specific environments, such as limiting access to lower environments only.
Managing Users
To manage users within the Next Identity console, ensure your Role includes CRUD permissions for the User entity.
Upon having this permission, you'll notice an engine icon in the top-right corner of the screen. Clicking this icon redirects you to the User List within the Manage Users feature.

Top Bar with Manage Users Button
User List
Upon accessing the Manage Users feature, the initial screen displayed is the User List. Here, you can effortlessly view, search, and filter users, enhancing your efficiency in user management.
You'll only see users within the same organizational level and company as yours.
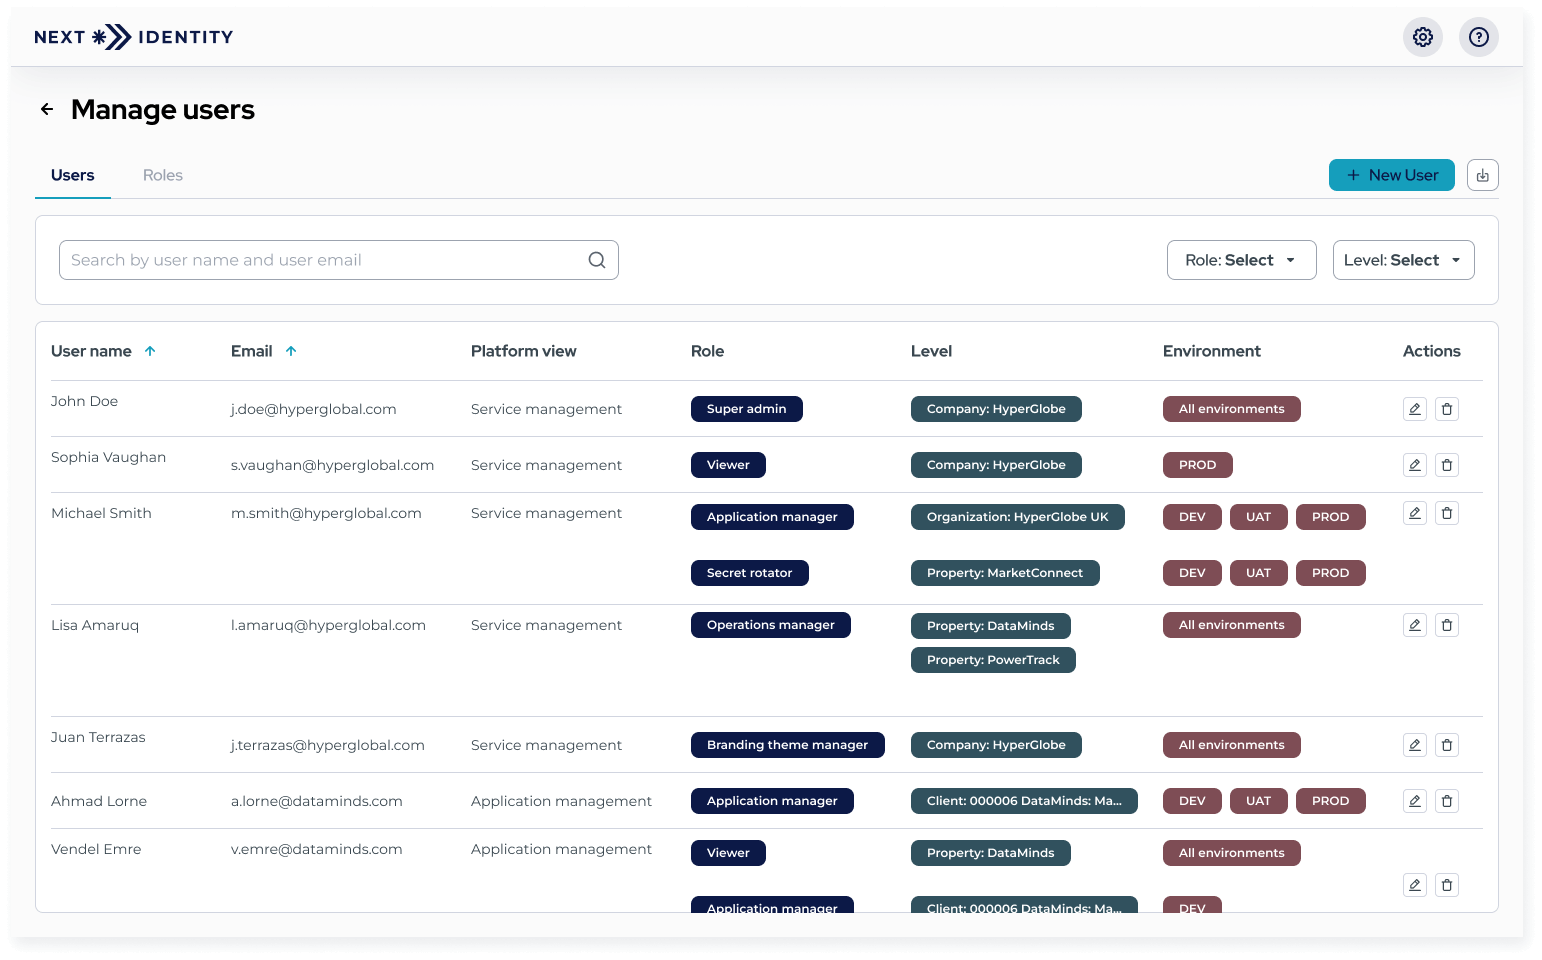
Users tab displaying the full list of users in the Manage Users feature
Roles list
In the Manage Users feature, you can also find the Roles tab, which presents a list of all existing roles. It includes the number of users associated with each role, details about the permissions for each role, and the features within the product.
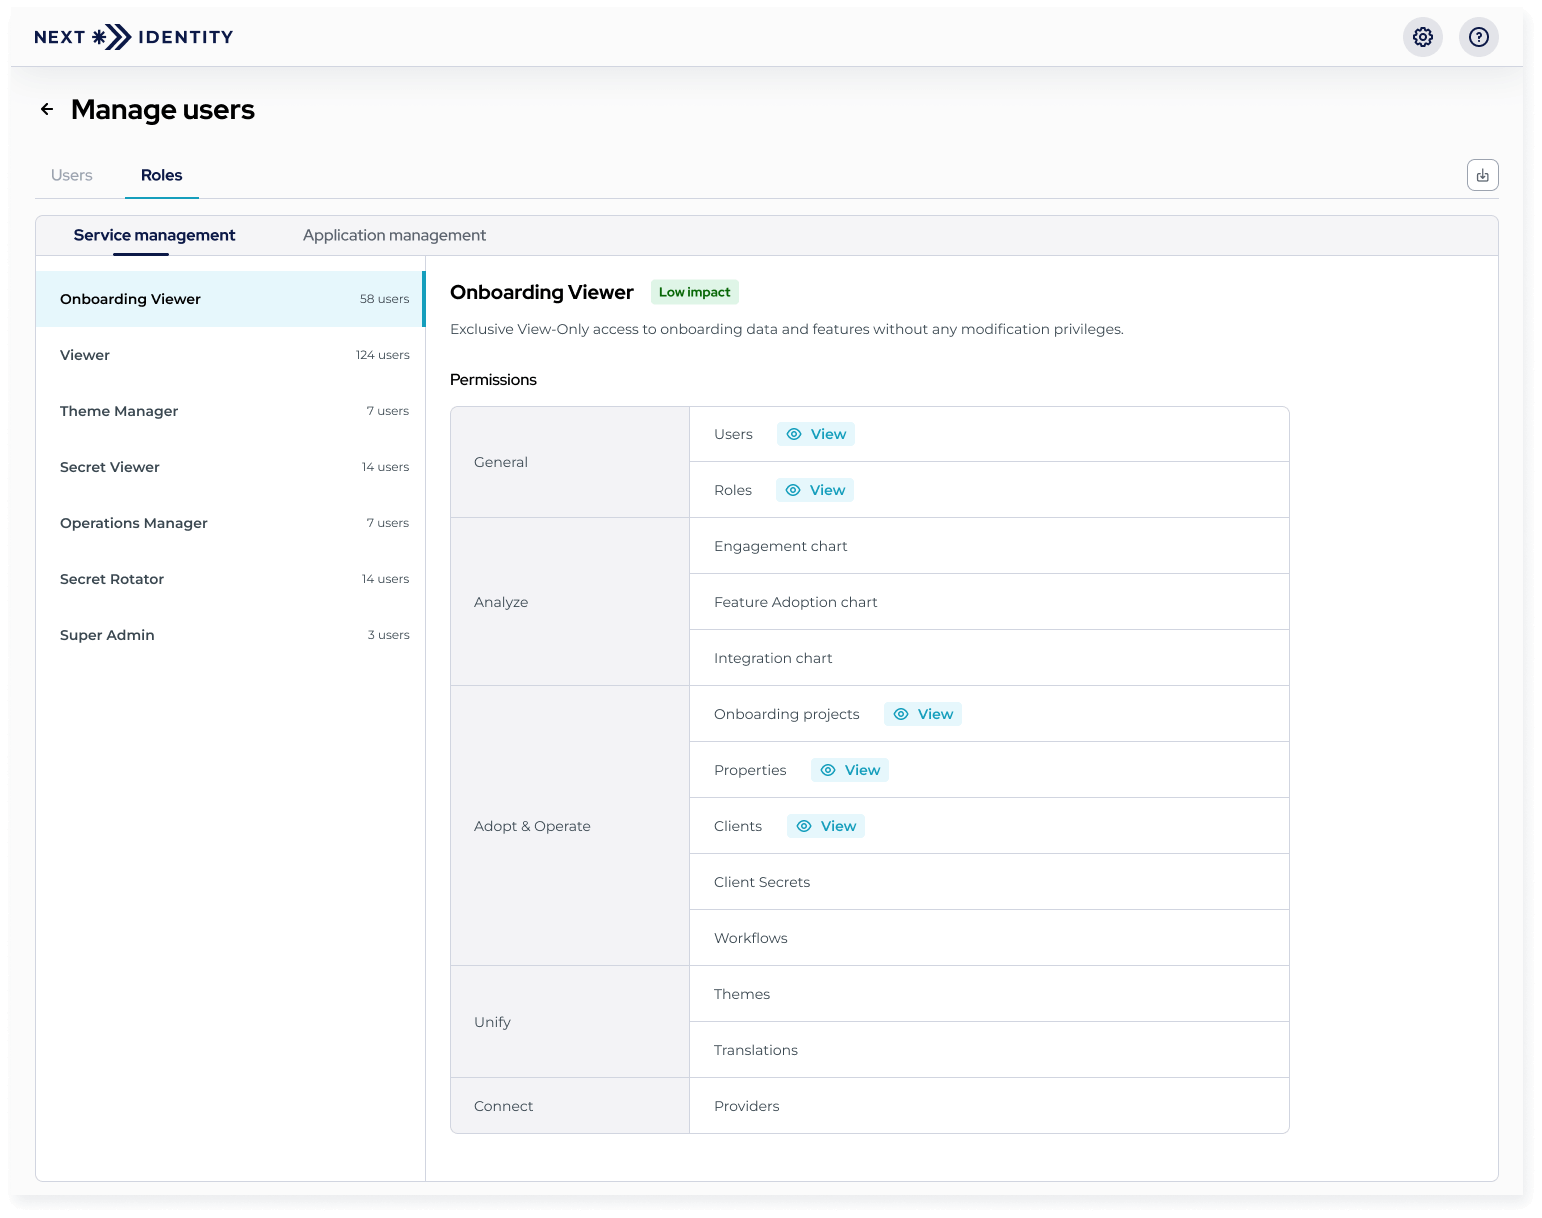
Roles tab in the Manage Users feature
Add a new user
To add a new user, click on the "New User" button. This process consists of five steps:
-
Step 1: Provide the user's full name, email address and select the platform view (Service management or Application management).
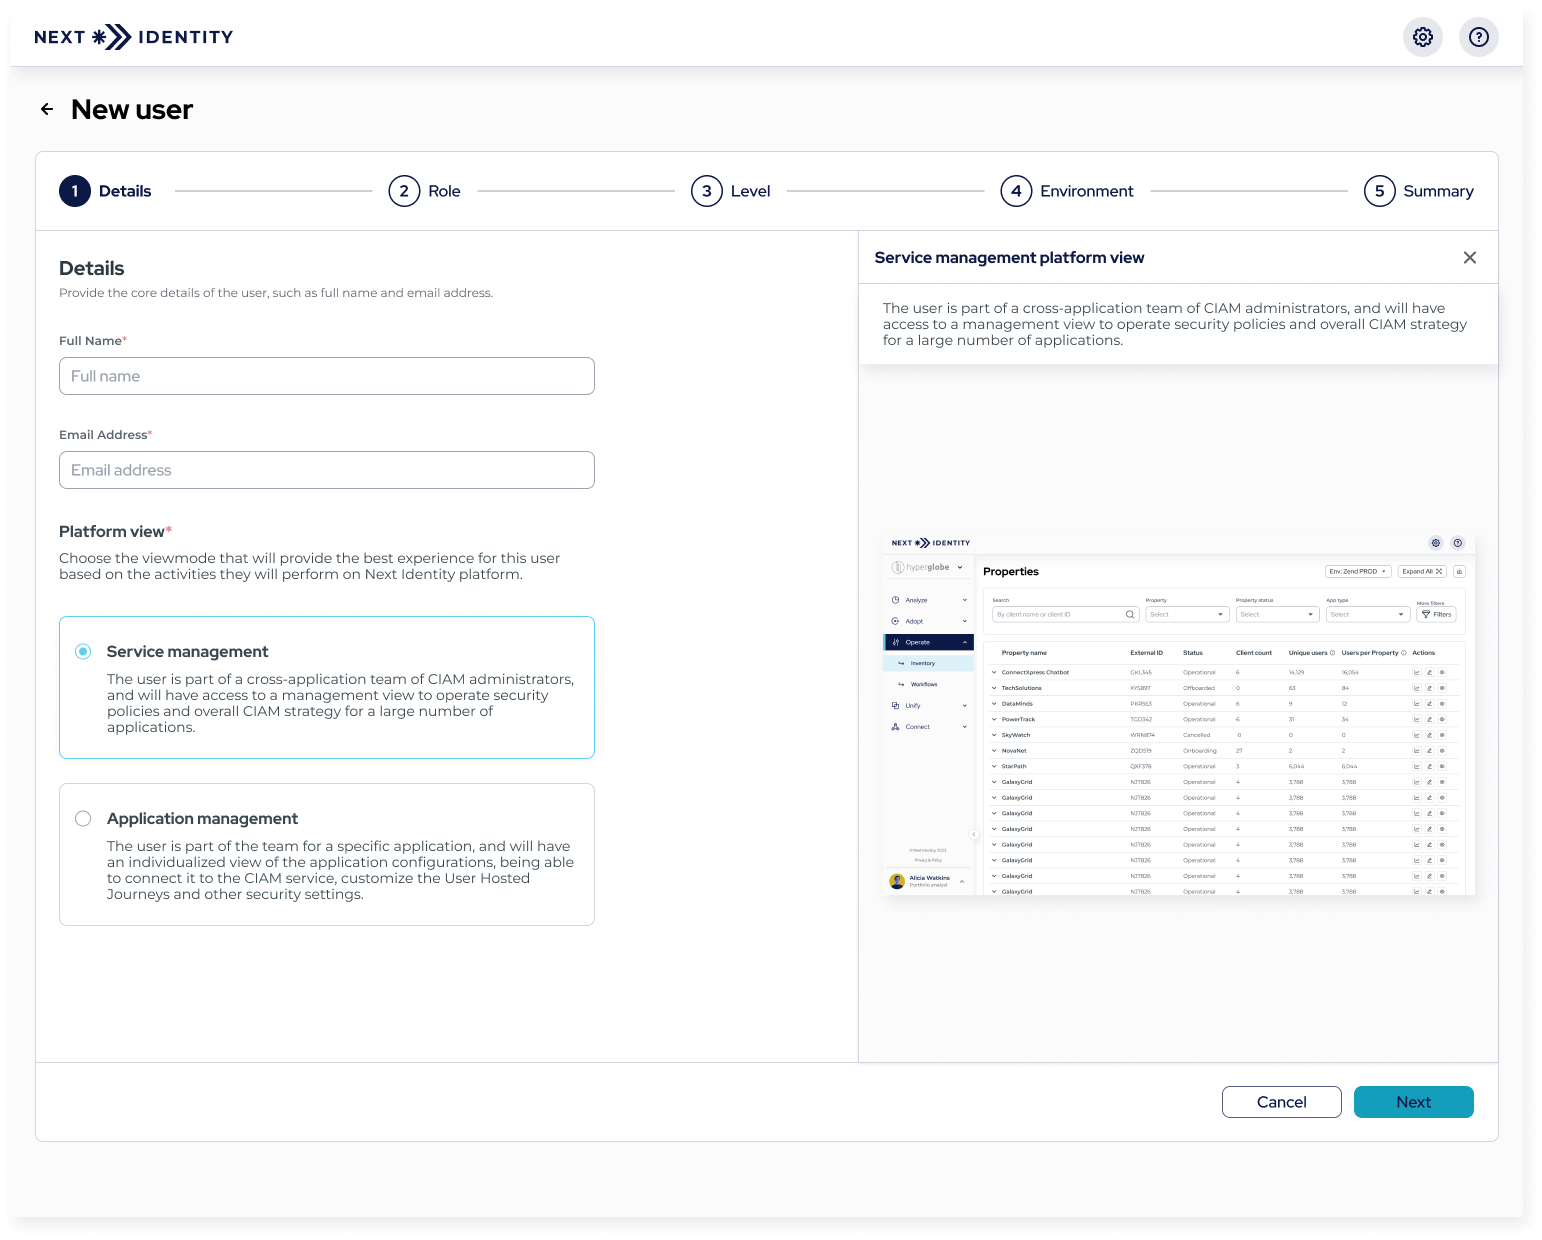
Step 1: Enter user details and select the platform view, in this case: service management
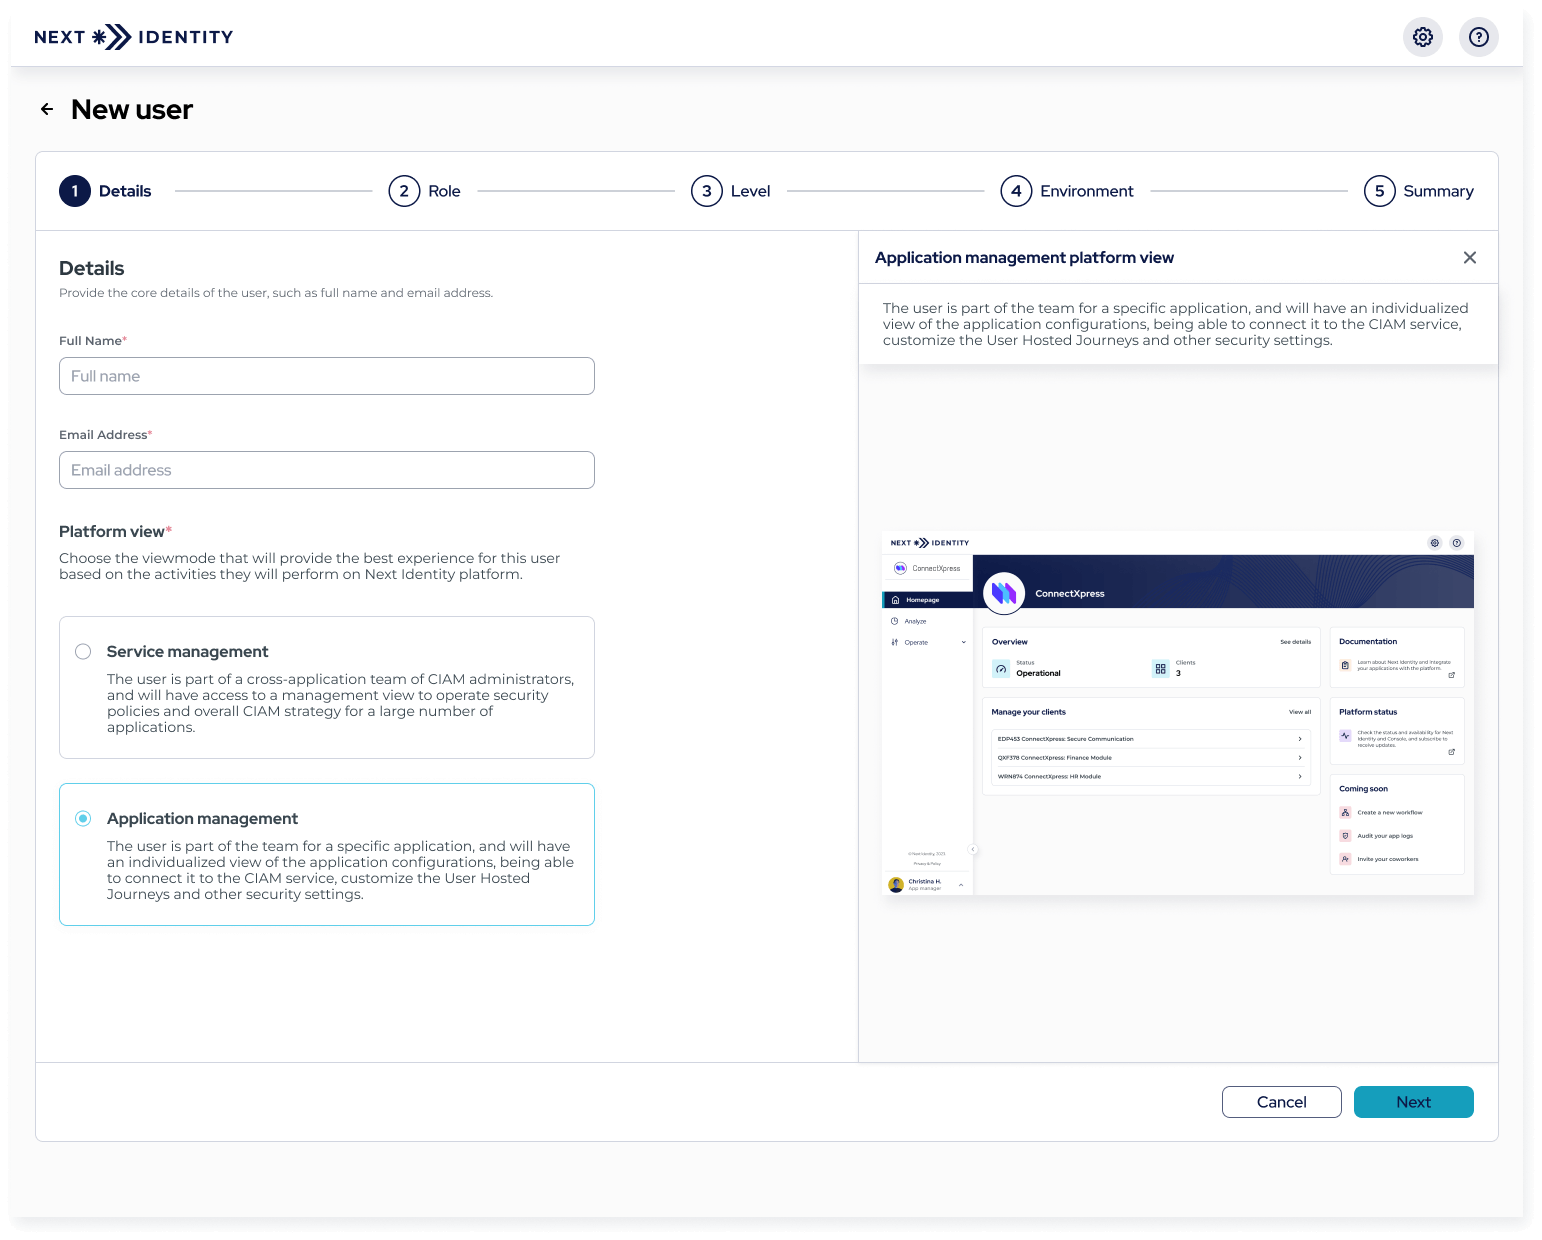
Step 1: Enter user details and select the platform view, in this case: application management
-
Step 2: Choose one of the available predefined roles. These roles will vary depending on the platform view selected in the previous step. The information about the selected role will be displayed on the right side of the screen to help you make an informed decision.
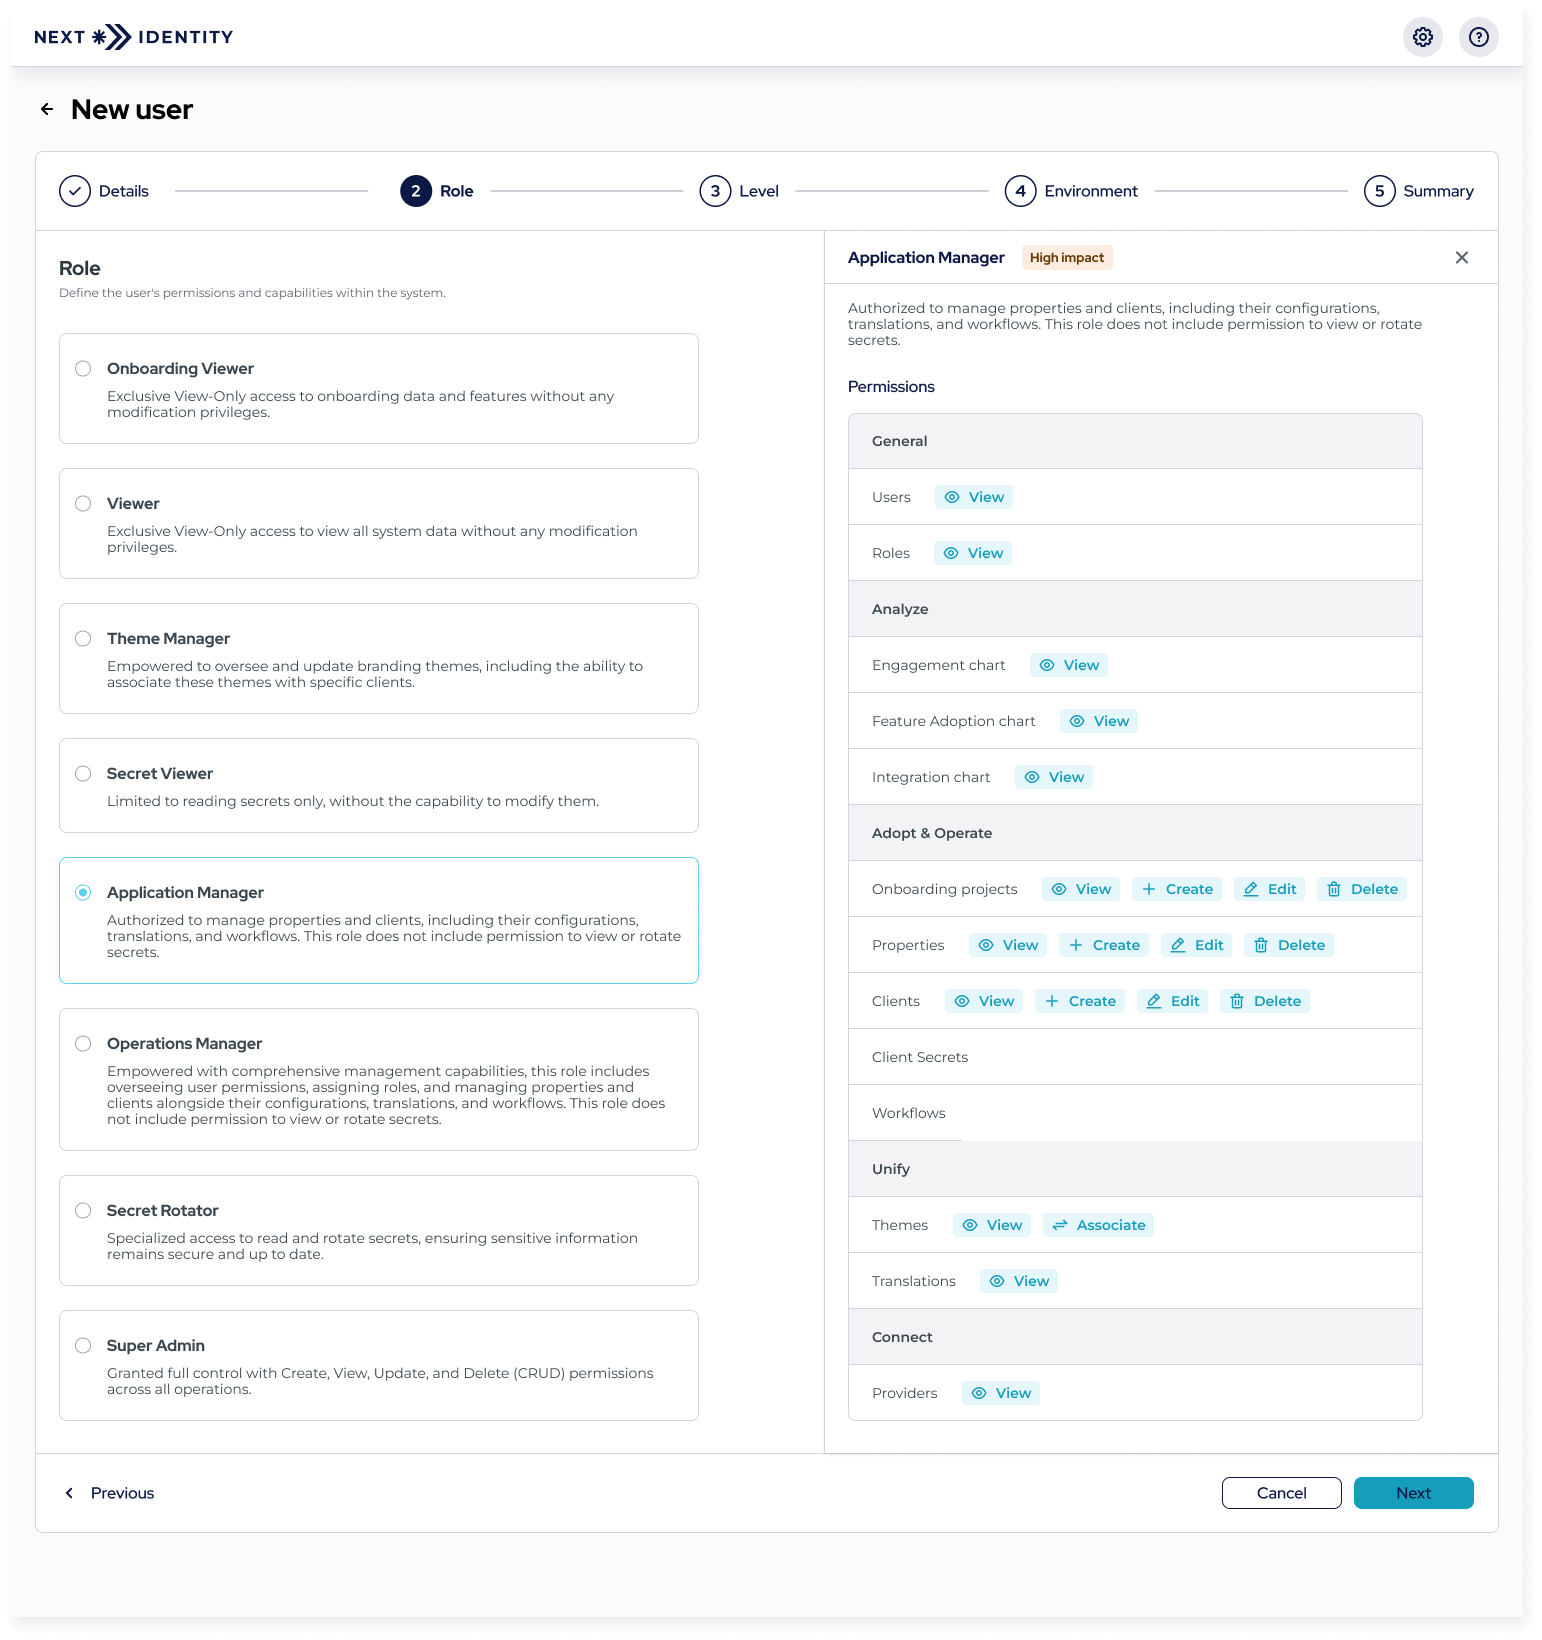
Step 2: Select a predefined role and see its details
-
Step 3: Select the access level for the user.
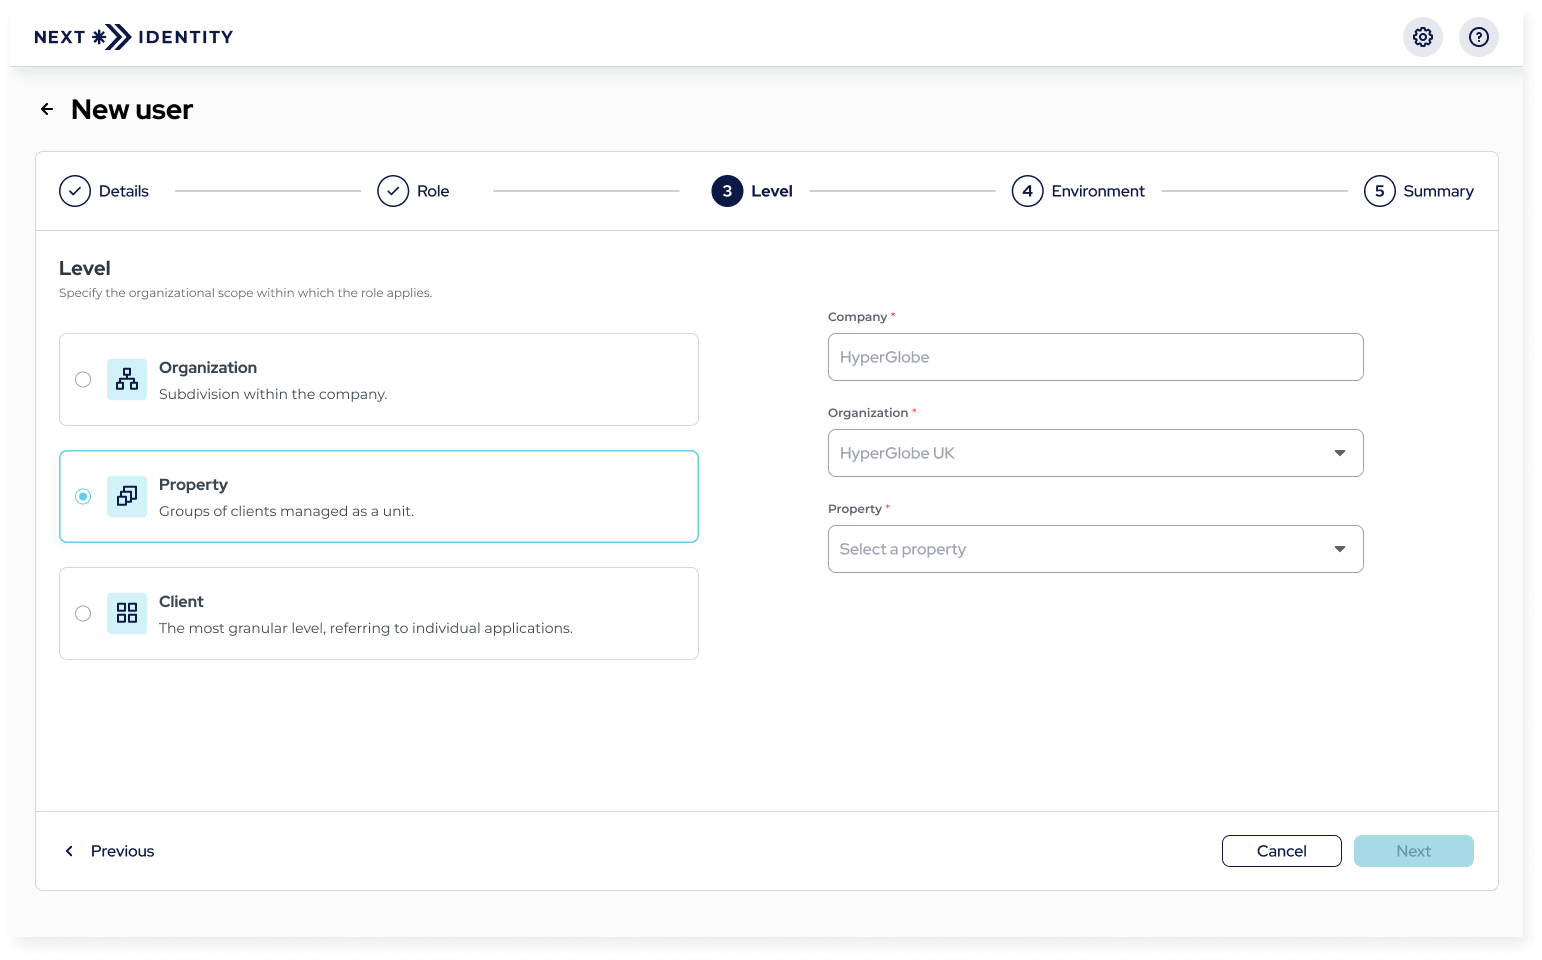
Step 3: Choose the access level
-
Step 4: Choose the environments the user will have access to.
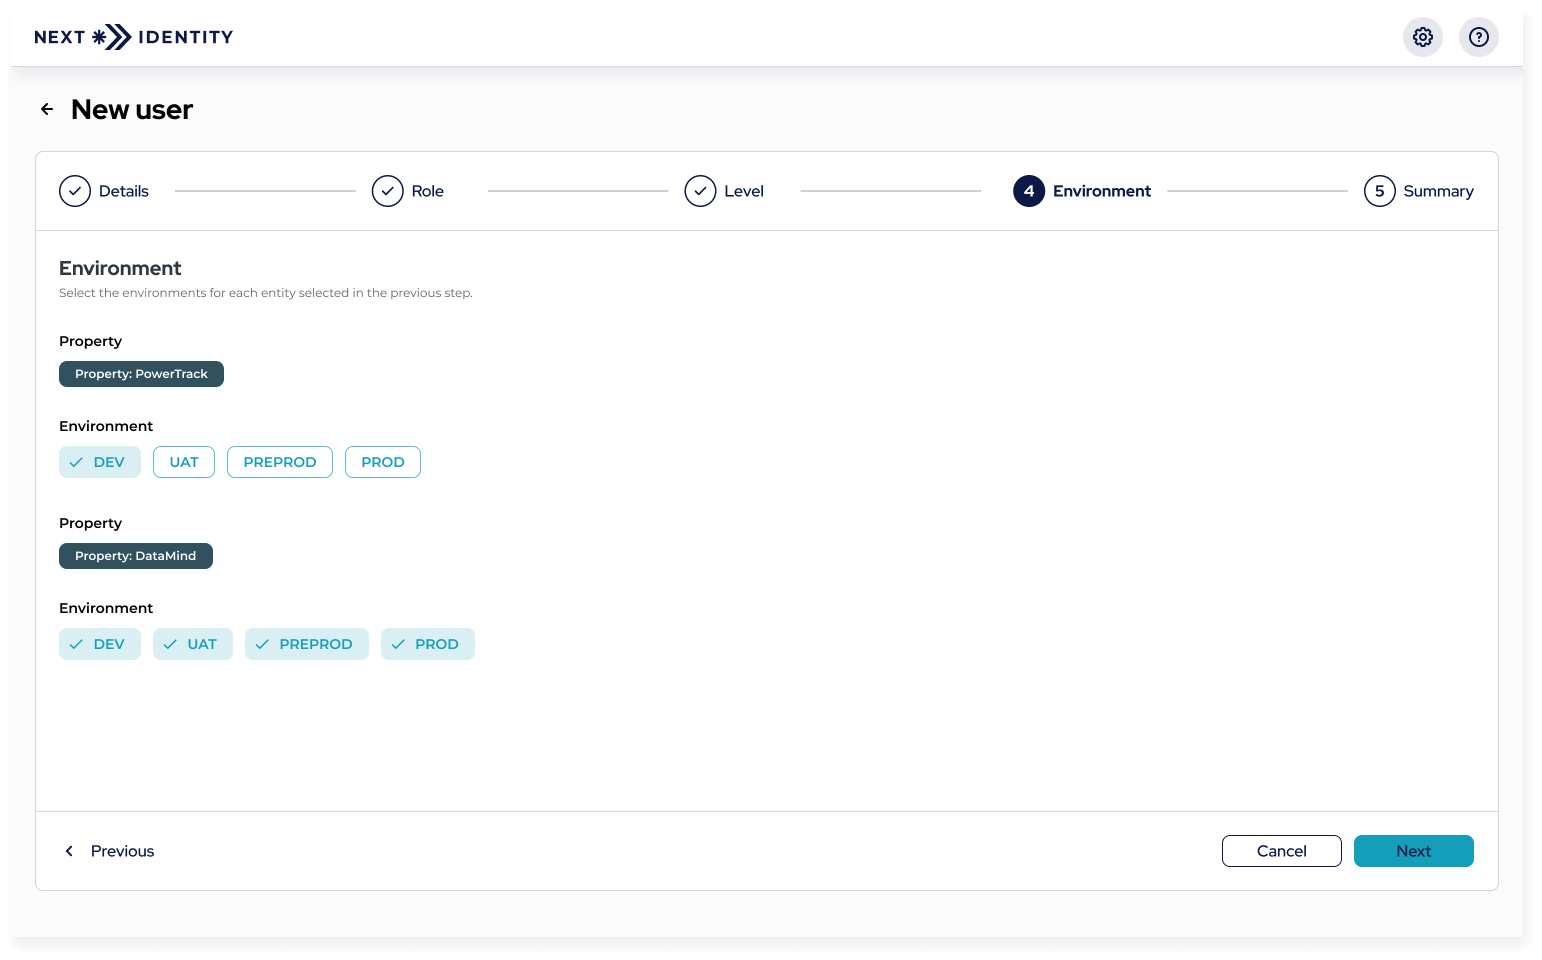
Step 4: Select environments
-
Step 5: Review the summary of your choices. You can edit the data you have input and the choices you have made. Additionally, you can add another role, as the Next Identity console allows users to be assigned multiple roles and access levels, providing versatile control over their interaction with different parts of the system.
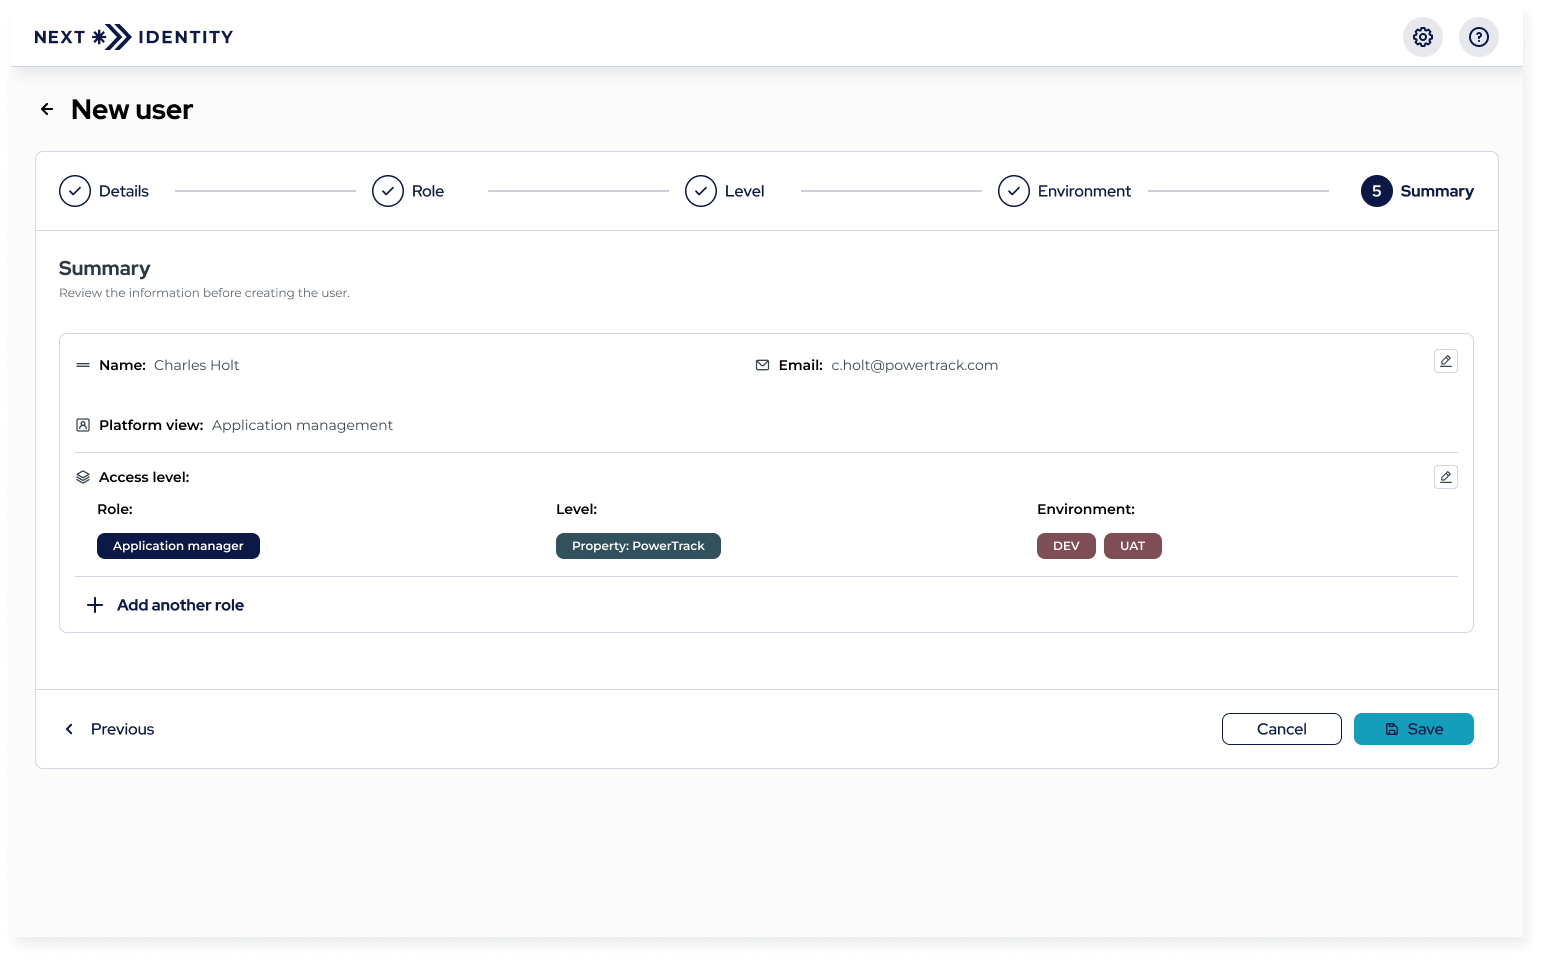
Step 5: Review and finalize user details
By following these steps, you can successfully add a new user to the system.
Edit a user
To edit a user, locate the user in the Users list. Once you have found the user, click the edit button (pencil icon) in the Actions column. Follow the on-screen instructions, which are very similar to the steps for adding a new user.

Edit button
Delete a user
To delete a user, locate the user in the Users list. Once you have found the user, click the delete button (trash icon) in the Actions column. Follow the on-screen instructions to complete the deletion process.

Delete button
User Management AdvisoryIf you need assistance to invite a user or manage roles, please contact your Next Identity consultant.
Updated 9 months ago